
Gel-o-meter
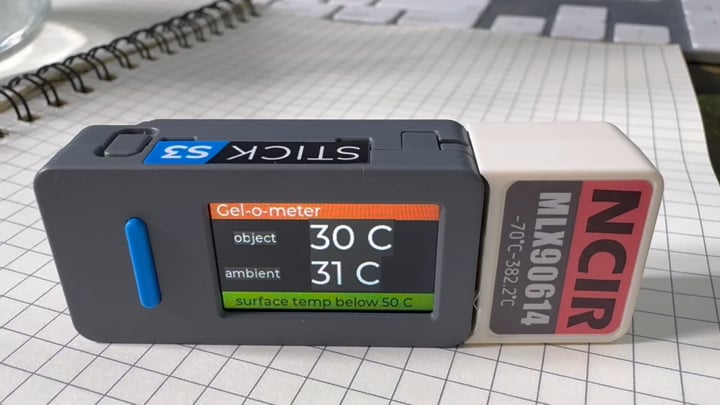
The Gel-o-meter is a simple and compact, battery-powered device to monitor the cooling of gel-based media. It uses an M5Stack Stick S3 device with a connected non-contact infrared temperature sensor to measure the surface temperature of an adjacent vessel, along with the internal temperature of the device. The sensor is accurate to 0.5ºC and has a fast response. When the device is turned on, temperature measurements are displayed on the screen. The sensor can be located appropriately next to the vessel - e.g. flask holding the molten agar or agarose after boiling in a microwave oven. Pressing the front blue button then activates comparative measurements versus a set point. If the measurement is over temperature a red indicator is set, as the object cools to below the set point, a green indicator is set and an audio alarm is set off. Re-pressing the front blue button stops the alarm.Hardware
StickS3 microcontroller
The StickS3 is a compact and high-performance programmable controller. It is powered by a ESP32-S3-PICO-1-N8R8 main control chip, supporting 2.4 GHz Wi-Fi wireless communication, with built-in 8MB Flash and 8MB PSRAM.
For human–machine interaction, it features a 1.14" LCD display, a BMI270 6-axis IMU sensor, and two programmable buttons. It has an audio system with ES8311 mono audio codec, combined with a high-sensitivity MEMS microphone and AW8737 power amplifier, enabling clear audio capture and high-fidelity audio output, with potential for voice recognition and interactive experiences. It also has a built-in IR transmitter and receiver, 250mAh lithium battery, magnetic back, various ports for expansion and USB-C connector for programming and charging. Weighs about 20g. Full details are at: https://docs.m5stack.com/en/core/StickS3
Temperature sensor
The M5StickC NCIR HAT is a single-point infrared temperature measurement sensor plug-compatible with the M5Stack "Stick" series of controllers. Is is a small module that contains a built-in MLX90614 non-contact infrared sensor, capable of measuring the surface temperature of objects. Unlike most contact-type sensors, this sensor detects temperature by measuring the infrared light waves emitted from the objects without physical contact, which gives it a wider measuring range than ordinary sensors (-70°C to +380°C) with a field of view (FOV) of 90°.
The sensor is a highly integrated device itself, with infrared filter, thermopile detector, low noise amplifier, high resolution 17-bit ADC (analog-digital converter) and powerful DSP (digital signal processing) unit. The sensor plugs directly into the end of StickS3. The calibrated output of the sensor can be obtained in digital form through a two-wire I2C interface. Details are at: https://docs.m5stack.com/en/hat/hat-ncir




UiFlow2 programming
Software support for reading the sensor is built in to UiFlow2. So programming the combined StickS3 and NCIR HAT device is uncomplicated. The appropriate combination of hardware is specified for the project, and the corresponding Blockly software elements are provided in the interface, and can be chosen and dropped into the workspace as needed. The 'behind the scene" issues - such as setting up initialisation routines, adjusting the port identities as different hardware choices, etc. are handled automatically.
In order to create a new device like the Gel-o-meter, define precisely the functions needed (maybe a minimal version at first), and decide how a user needs to interact with the device. Then open the user interface editor (UI Editor) and layout the interface elements that you wish to use - at least a first approximation. interactive editing is easy and can continue through the project. A prototype layout for the Gel-o-meter is shown below. The StickS3 screen operation is more limited compared to touch screen devices like the M5Stack CoreS3 series. The interface has a small screen with a single page interface. There is a title0 element which contains the name of the device. The label0 and label1 elements will contain the object and ambient temperatures seen by the sensor. The label4 contains informative and alert text.
Control
After the interface is laid out, the named elements can be 'wired' together in the Blockly interface (or Micropython). With the automatic serving of selected software modules through UiFlow2, Blockly is a very fast way of putting together prototype control systems, and testing (debugging) these interactively - especially for non-specialist programmers (like me).
The Blockly prototype shown right. The Setup initialisation contains the default hardware initialisation set up by UiFlow2, according to the hardware choices made. i2c0 is initialised for communication with the temperature sensor hat_ncir_0, which is also initialised. Two variables are declared, active set to false, and start set to the current machine time in milliseconds.
The operation of the device is at three levels:
First, the power switch button on the StickS3 is pressed once to turn the device on. (A double press of the power switch turns it off, and a long press re-boots the device). The controller and green LED under the switch will turn on, the screen will illuminate.
After the device is turned on, the main program loop will compare the current machine time (get ticks in milliseconds) with the saved value stores in the variable start. If 1000 milliseconds have passed, the temperature sensor is read (get hat_ncir_0), the two floating point values are converted to integers and displayed as label0 and label1, respectively. The sensor contains both the IR non-contact thermometer and an on-chip temperature sensor. Over time, ohmic heating or proximity to a heated sample can contribute to heating of the internal sensor, so this may drift above local air temperature. The sensor reads and display updates are set to loop every 1 sec. This can be adjusted by changing the threshold value of 1000 milliseconds.
While this is happening, the device can be positioned to read a sample - for example, a flask of molten agar or agarose medium. These are often boiled in a microwave oven, and can be at 100ºC. Ideally the media would be cooled before addition of thermosensitive supplements for culture plates, or pouring of electrophoretic gels. The small battery-powered device can be placed beside a recently heated sample, and the front blue button (BtnA) pressed to activate the device. At this point, the grey label4 showing the text "press blue button to start" is replaced by a red label "surface temp above 50 C" (assuming the detected temperature is above that set point). If the detected temperature drops below 50ºC, label4 changes colour to green and displays the text " surface temp below 50 C" and the inbuilt speaker plays a 50msec, 1000Hz audio alert. The alert plays once every second as the temperature falls below the set point.
A routine is set to continuously monitor the blue-coloured button BtnA. This acts as a toggle for the state of the active variable. active needs to be true for the temperature comparisons and alert to be activated. Conversely. toggling the blue button will halt this program loop and stop the alert.


Gel-o-meter placed next to a beaker of cold water


Gel-o-meter placed next to a beaker of hot water
Notes:
The non-contact IR sensor will measure the IR emitted from the surface of an object. While this measurement is generally accurate and has a fast response, it will not always correspond to the temperature of the contents of a vessel. So some care must be taken with determining the setpoint. The qualitative approach for molten agar/agarose solutions has been to wait until a heated container cools until it is comfortable to hold in the hand, so 50ºC is a good starting point.
The StickS3 and NCIR sensor module can be attached with double-side tape provided with the sensor package. A thin layer of silicone adhesive can also be used for a sturdier mount, short of permanent attachment by cyanoacrylate or epoxy resin.
Further, M5Stack provide 3D files for most of their products. These are useful if you need to print a support or holder for the device. The 3D files for the StickS3 device can be found at: https://github.com/m5stack/M5_Hardware/tree/master/Products/K150_StickS3/Structures.
It would be simple to set the second programmable button BtnB to cycle through a series of suitable alternative set points, and to display the current settings.
Similarly, the timing of reads could also be shortened or lengthened by adjusting the timing threshold. and this could be adjusted through the BtnB button.
M5Stack market a range of similarly packaged sensors and prototype boards (https://shop.m5stack.com/collections/for-stick) so the approach can be extended with different sensors. In addition, the StackS3 has a built-in Grove port that allows connection of an even greater selection of hardware (https://shop.m5stack.com/collections/unit).
The same MLX90614 non-contact infrared sensor can be obtained as a (cheaper) breakout board from electronic parts suppliers, as well as Amazon and Aliexpress. As an I2C device with relevant software libraries available, it should be relatively simple to interface to the microcontroller of choice.
M5Stack also supply the NCIR2 Unit (https://docs.m5stack.com/en/unit/NCIR2) which includes an RGB indicator LED, function button and buzzer - with Grove interface.


biomaker.org