


Gene gun
A key area of scientific interest in plants is engineering of chloroplasts. Chloroplasts are the site of light-driven energy production, source of reducing power and much biosynthetic capacity in plant cells. The organelle itself has a very small genome, present in many thousands of copies per cell and capable of prodigious levels of gene expression, and unlike nuclear genes - no gene silencing. Chloroplasts are attractive targets for genetic engineering, but transformation of the organelles has been limited to relatively few plant species.
Marchantia polymorpha is a simple liverwort plant, with characteristics that likely mirror features of early terrestrial plants. It grows prostrate, without defined root or stem, its gene content is highly reduced, and it regenerates spontaneously without the need for external growth factors. It produces vegetative propagules automatically and huge numbers of single-cell spores after crossing of male and female plants. Spores can be collected en masse, and used for transformation or genetic studies. With these features, Marchantia likely holds the record for speed and ease of chloroplast transformation.
However, the introduction of transforming DNA into target chloroplasts requires biolistic delivery - high velocity delivery of DNA-coated microparticles into target cells - germinating spores in the case of Marchantia.
Central functioning components of the gene gun. The CO2 gas supply is connected via a press fit connector on the electrically activated solenoid (top). A stainless steel Luer lock adapter is threaded on to the outlet port of the solenoid. A filter holder (with stainless steel grid and microparticles) and barrel (a disposable glue dispenser nozzle) are placed on the Luer adapter. There are a number of alternative nozzles that can be used as barrels, and will affect the velocity and spread of accelerated microparticles, and a representative sample is shown.
Commercial instruments
Commercial systems for biolistic delivery systems are based on high-pressure gas sources, usually helium, with solenoid controlled release of gas through rupture discs or lateral blasting of microparticles from some kind of a support surface. The workhorse instruments are the Biorad PDS1000 and Helios Gene Gun (below, left), with a small number of similarly engineered systems from Chinese manufacturers. The commercial systems can cost up to £30K, and often involve specialised materials for operation, from helium canisters to rupture discs to gold particles.


DIY instruments
Unsurprisingly, there have been a number of efforts to build cheaper alternatives. These include devices based on hand-pumped gas sources or CO2 Sparklet canisters and solenoids connected to plumbing supplies, etc. - an example is shown right. Some devices have exploited alternative materials, like Parafilm as disruption discs, and others have employed disposable pipette tips as coated surfaces for holding microparticles, or the particle inflow technique, invented by John Finer and colleagues. The particle inflow technique simply relies on coating microparticles onto a mesh, which is held in the path of solenoid-released gas flow. The particles are directly accelerated into the biological target, and generally lower gas pressures are required. Only the particle inflow gene guns have found major use as alternatives to commercial instruments, and that was the starting point for the design shown here.
Design principles and building blocks
The design was framed around easy construction and affordability, and based on:
Use of an easily available and safe gas source. I chose Sodastream CO2 canisters as these are reasonably priced (~£20 ea), contain a good amount (425g) of carbon dioxide and are widely available.
In addition, it is possible to obtain pressure regulators for the canisters. I purchased a 0-60 psi mini regulator with built-in press-fit connector for 6mm-1/4" pneumatic tubing (~£30).
The 'firing' of the gene gun is triggered by a 12V 2-way, normally closed pneumatic solenoid with 6mm press-fit connectors (£14).
The outlet of the solenoid has a 1/4" BSP thread - this was paired with a compatible threaded stainless steel Luer lock coupler (£4).
A 12V mini vacuum pump (10L/min) was added to provide a counterbalance to gas release (£18).
An M5Stack CoreS3 SE is used as the electronic controller (£35). The CoreS3 SE is modular device with integrated touchscreen output ports and capable of accepting stackable modules that add new hardware functions.
The CoreS3 SE device is paired with an M5Stack 4-Channel Relay Module (£15), which provides simple electrical connections and programmatic control of the solenoid and vacuum pump.
The relatively low gas pressure available through the system means that particle inflow is the practical method for delivery of microparticles (higher pressures would be required for effective use of disruption discs). 13mm polypropylene membrane filter holders with Luer connectors are used as reusable holders for the micro particle support mesh.
Stainless steel mesh discs cut to 12.7mm diameter are used as supports for microparticles. These are available cheaply as pipe screens, used for pipe smoking (100x for £9.50).
Wide gauge nozzles with Luer fittings are used to provide disposable barrels for micro particle delivery. These are available in different gauges, lengths and shapes (tapering vs. parallel) for trial.
Press fit connectors, tap, in-line filter and pneumatic tubing are used to pipe gas flow through the system.
A 3D printed housing is required to support the electro-mechanical components and provide a secure platform for positioning the samples.
A 9cm mini lab jack (£10) is used to regulate the distance between the outlet of the gene gun and target.
An off-the-shelf perspex housing (intended to contain dust during polishing operations (£72) is used to provide a protective housing for gene gun operation. Although the device uses lower pressure sources than a number of the commercial instruments (60psi vs 1000psi), it is wise to have a level of shielding to contain any dispersed materials that might arise during operation.


Barrel shroud and vacuum pump. A 3D printed shroud is positioned over the the filter holder and barrel. This is held in place by magnetic attraction, with neodymium magnets glued into the 3D support housing and shroud. The channel between the barrel and shroud has a partial vacuum applied through connection to a 10L/min mini vacuum pump attached to the back of the device (lower left). This is connected via a press fit connector to a 3D printed channel that runs through the support structure - to connect with the shroud component. The connection between the support and shroud is sealed with O-rings to minimise leakage of the vacuum.
Construction
The first step in construction is 3D printing of the support housing and shroud. These are printed with standard PLA filament, and I used additional wall thickness (4 layers) to improve air tightness and strength of the relevant sections of the objects. The footprint of the main structure is less that 200x100mm, and will fit on most print beds. The main support and shroud are printed in inverted orientations with 'tree' type support.


Front view of support housing
Rear view of support housing
View of connection with shroud housing
Housing for shroud over barrel and micro particle holder
Connection between completed support housing and shroud


3D printed support for CO2 canister
...and with Sodastream canister in place.
Identify the 2-way pneumatic solenoid. It has clearly marked inlet and outlet ports which have 1/4" BSP threads (note that other types of thread are available, and the choice isn't critical - just that the connected parts need to be thread-compatible). Press-to-fit connectors are used throughout the build for simple assembly. A fitting for 6mm (1/4") pneumatic tubing with a 1/4" thread is screwed onto the inlet port of the solenoid. Note: for all threaded gas fittings, several layers of PFTE (Teflon) tape are used to secure airtightness.
A stainless steel Luer lock adapter with 1/4" BSP thread is screwed into the matching outlet port of the solenoid. Again, Teflon tape is used to ensure an air tight seal.
The modified solenoid assembly is slotted into the top of the 3D printed support structure with the Luer lock adapter pointing downwards. The solenoid is secured with two M4 20mm bolts that engage with matching threads in the metal part of the solenoid body.
3D printed interchangeable shrouds are magnetically held over the micro particle holder and barrel assemblies, which allows convenient additions and removal. The shrouds and support frame have printed sockets for the placement of small magnets for fastening. I have used 10mm diameter, 2.2mm thick magnets that claim to have a 2kg pull (smaller magnets would do a reasonable job too, I think). The magnets need to be fastened securely to the respective parts, with opposite poles facing. A first task is to identify the N/S poles. This is easy if you have a compass to hand, where the north side of a compass needle will point at the South Pole of a magnet. Otherwise this can also be done by placing the disc magnets on edge on a smooth flat surface, like a glazed ceramic plate. These strong magnets should rotate (a small twist might be needed to overcome friction) to align themselves with the Earth's magnetic field. So the face pointing North will be the north side of the magnet.
The disc magnets should have the magnetic poles labelled. This will allow them to be fixed in the appropriate orientation so that opposite poles are facing each other at the interface between the adjoining parts, so that they are attracted together. The magnets need to be glued in place with tight, permanent bond. As an example, I have used a 3D printing superglue from Arka Biotechnologie GmbH. Be sure to use gloves for this operation, and allow to cure well before using the parts.
The shroud parts fit against the larger support piece. There is a 3D printed channel for air passage from the shroud to the back of the support, to the vacuum pump. In addition, the filter holder and barrel assembly pass through the support and ideally the connections between the 3D printed parts are airtight - to best maintain a partial vacuum between the shroud and barrel. Therefore, the connections between the shroud and support are printed with protruding circular vents with insets to hold silicone O-rings (18mm OD, 12mm ID, 3mm thick, and 19mm OD, 13mm ID, 3mm thick, on the vacuum and solenoid channels, respectively). These help maintain a seal between the magnetically held parts.
The vacuum pump is bolted to the rear of the support structure with 4x M3 20mm bolts and nuts - aligned with the shallow inset in the 3D print.
Use a 1/4" tap set to carve a thread into the aperture printed into the rear of the support, positioned where the internal channel leads to the shroud. Care must be taken to avoid damaging the thread through mis-alignment or over-tightening.
Cover the thread of a 1/4" 6mm press-fit adapter with several layers of PTFE tape, and carefully screw this into the tapped hole. Avoid over-tightening.
The vacuum pump should now be connected to this press-fit adapter. The diameter of the vacuum pump inlet is larger than 6mm pneumatic tubing, so a small section of 12mm tubing is used. One end of the tubing section is pushed over the pump connector and the other is connected to a press-fit 12mm to 6mm reducer.
Another section of 6mm tubing is press-fit to the reducer, and used to connect to an inline vacuum filter (ZFC100-06B), which has 6mm press-fit connectors.
Another piece of 6mm tubing is used to the 6mm press-fit adapter screwed into the back of the support.
Now, pneumatic tubing is used to connect the Sodastream CO2 source to the solenoid in the support structure. A manual valve is used to allow independent control of the gas source. First, locate the mini-regulator for the Sodastream canister.
Cut a short (3-4cm) length of 6mm tubing and use this to connect the 6mm press-fit outlet of the Sodastream pressure regulator to one side of a manual pneumatic valve. (The tap is open if aligned with the long axis of the connected tubes, and closed if positioned at right angles.) Put it in the closed position.
Position the top black plastic knob of the regulator in the closed position.
Screw the regulator onto a charged Sodastream stream canister.
The canister can be laid next on the 3D printed cradle to keep it securely in position.
A 50-60cm long piece of tubing is cut and one end inserted into the press-fit connector on the upper side of the solenoid.
The other end is connected to the press-fit connector on the manual tap - to complete the connection between canister and solenoid.


(2) Two-way solenoid with press-fit connectors
(4) M4 bolt fasteners
(5-6) Underside of support with magnets fixed
(5-6) Topside of shroud with magnets
(7) Cross-section of the support showing the channels with insets for holding the O-rings
(7) Silicone O-rings
(7) O-rings in position


(3) 1/4" BSP Luer lock adapter


(4) Fixed solenoid assembly
(8) Rear-mounted 12V mini vacuum pump


(9-10) Rear 1/4" 6mm press fit adapter


(13) Tubing connections for vacuum pump and inline filter


(12) Inline vacuum filter
(11) 6mm to 12mm press-fit reducer


(15) Manual tap
(16) Knob on mini-regulator
(17) Regulator and tap
(18) Cradle for Sodstream canister
(19) connection to solenoid
(20) Final connection to CO2 source
DNA cartridge
The gene gun is designed with a replaceable cartridge which holds a stainless steel mesh to hold DNA coated microparticles. Microparticles are loaded onto the 12.7mm mesh, and held in a 13mm filter holder. The filter holders contain a silicone O-ring and a plastic mesh. The plastic mesh is removed and replaced with the stainless steel mesh. The pre-cut steel meshes are available cheaply as inserts for smoking pipes (<£10 for a packet of 100).
The filter holder has Luer adapters at each end, and can be slipped on to the Luer lock adapter attached to the outlet of the solenoid. Similarly, a Luer compatible syringe nozzle or needle can be fitted to the end of the filter holder to provide a barrel. When the (normally-off) solenoid is activated, gas flow is directed through the attached filter holder, across the stainless steel grid, to sweep particles off the grid and through the attached barrel towards the target.
The filter holders can be purchased in batches of 50 (~50p each from Aliexpress). The filter holders are robust and autoclavable/dishwasher-safe and reusable. Assemblies can be prepared in advance of a transformation experiment as preloaded DNA cartridges.


Barrels
The size and shape of the attached barrels will affect the velocity and spread of discharged particles. Luer lock and Luer slip are standard connections for syringes, and there are many applications that require a syringe nozzle, rather than injection needle, e.g. application of glues or solder paste. Many different types of nozzle are available at low cost. These range from conical 'pipette tip'-like plastic nozzles with different diameter apertures - to nozzles with cylindrical barrels of different lengths, diameters and materials. The latter can be obtained with plastic or stainless steel barrels, with common lengths ranging from 0.25" (6.35mm) to 2.0" (50mm) - with some gauges even available up to 2" and 3" in length. All metal nozzles can also be obtained.
I obtained a wide variety of this different types and am testing these for impact on micro particle delivery. Initial indications are that the longer, cylindrical barrels impart greater penetrating power for micro particle delivery - presumably due to greater acceleration afforded by an extended barrel. These tests simply looked at close-range firings at thin paper targets, and further testing is required - especially with biological targets and reporters. These will be documented here.


Vacuum shroud
The use of high pressure gas for biolistic delivery of microparticles necessarily exposes the target sample to a disruptive high velocity burst. Previous gene gun designers have attempted to minimise this by constructing nozzles with side vents for diffusion of the gas burst. John O'Brien (MRC-LMB, Cambridge) used modified nozzles with a form of muzzle brakes for the Biorad Helios gene gun, and the Groisman Lab (UCSD, San Diego) built a microscale delivery device with an external vacuum to counter blast effects. The Biorad PDS-1000 device operates with the sample exposed to the muzzle in a partial vacuum mainly to reduce air resistance, but may help diffuse blast effects. In the spirit of these observations, I decided to incorporate the use of a partial vacuum around the muzzle. It should be noted that the choice of approach here was based on general assumptions - with no guarantee that the actual implementation would make any difference! Testing awaits.
In this particular implementation, I fixed a mini vacuum pump behind the device. The pump operates on a 12V (10W) source with a capacity for 10L/min. The vacuum pump is connected the air intake to a channel that is embedded in the 3D printed parts - that leads from the back of the device through to a shroud that is positioned over the front part of the gun assembly. The shroud can be slipped on and off the DNA cartridge and barrel, and is held in place magnetically, with O-rings to form a gas-tight seal.
The dimensions of the shroud need to be adjusted, depending on what barrel size/length is being used. Examples are shown below. Testing of the barrels is required before settling on a final design.


Electronic control
Operation of the solenoid (for gas release) needs to be operated electronically due to the millisecond actuations required, along with the benefits of being able to finely regulate the timing, and programatically switching the vacuum pump. The M5Stack CoreS3 SE provides a useful and easily programmed controller for this. The device includes a 2" touch screen for building an interface for control and feedback - and extensible with SD card storage and WiFi communications. The M5Core devices are compatible with a wide series of stackable modules and plug-in modules that provide extended functions.
The 4Relay module gives access to 4 mechanical relays. The module simple plugs into the base of the CoreS3 SE controller via the 2x15 pin M-bus connector. The module a sophisticated device with its own microcontroller and uses the I2C communication protocol for control, saving IO resources. The relay module supports DC circuit switching, with a maximum load capacity of 24W (DC 24V @ 1A) per channel. It includes external power supply voltage detection and a DC-DC circuit to power the host. It is suitable for controlling the switching of small load 12V circuits such as the solenoid (4.8W) and vacuum pump (10W). More information about the module can be found at: https://docs.m5stack.com/en/module/4Relay%20Module%2013.2_V1.1
The M5Stack UiFlow2 programming interface provides a full set built-in support for operation of the CoreS3 SE and the 4Relay, accessible from the Blockly graphical programming interface. So two relay outputs were used to regulate (i) the vacuum pump and (ii) the solenoid using touchscreen activated software controls.
Overall operation
The general procedure for operating the particle inflow device is:
Remove the magnetically-held 3D printed vacuum shroud.
Insert a fresh DNA cartridge and barrel onto the Luer connector.
Replace the vacuum shroud.
Open the gas line by manually opening the regulator valve to set at ~60 psi, and operating the tap to release gas to the solenoid. The solenoid is fixed in the closed position unless electrically actuated.
Turn on the vacuum pump and allow to equilibrate for a short time.
Open the solenoid for a set period of time. The minimum opening time for control by a mechanical relay is about 10msec.
Repeat the shot one or more times if necessary.
Turn off the vacuum pump.
Manually close the tap on the gas line.
Remove the sample for further treatment.
User interface
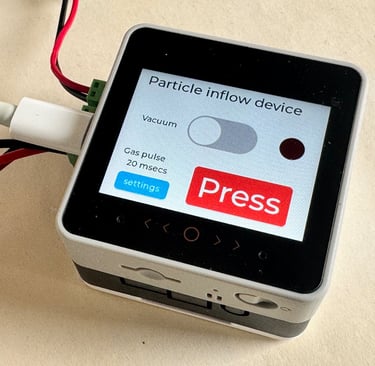
To create a user interface, the LVGL screen designer was used to layout two touchscreens. The first screen was the default screen with some status indicators, labels, switches for the vacuum pump and trigger for transient opening of the solenoid. The "settings" button causes loading of the second screen, which allows setting of the time in milliseconds that the solenoid will be opened, selected using a multi-way switch. This value is stored in the variable pulseLength. All of the on-screen elements have unique names, and corresponding Blockly elements are used to interrogate and set the different elements. The speaker in the CoreS3 is used to provide audible feedback. The corresponding Blockly scheme for this simple controller is shown (right). All blocks are provided by the UiFlow2 environment.



References
Commercial instruments
https://www.wealtec.com/product/gds80.html
DIY gene guns
https://www.oreilly.com/content/how-to-build-and-use-a-gene-gun/
https://2016.igem.org/Team:Cambridge-JIC/Biolistics
https://2018.igem.org/Team:WPI_Worcester/Hardware
https://www.hackster.io/379951/open-source-biolistics-enhancement-automation-7a974e
J J Finer 1 , P Vain, M W Jones, M D McMullen. Development of the particle inflow gun for DNA delivery to plant cells. Plant Cell Rep. 1992 Jul;11(7):323-8. doi: 10.1007/BF00233358.
Tsugama, D., Takano, T. Developing a tool to shoot genes by a man-made air pressure. J Genet Eng Biotechnol 18, 48 (2020). https://doi.org/10.1186/s43141-020-00067-1
Kao, Chien-Yuan & Huang, Shin-Hui & Lin, Chiu-Mei. (2008). A low-pressure gene gun for genetic transformation of maize (Zea mays L.). Plant Biotechnology Reports. 2. 267-270. 10.1007/s11816-008-0067-2.
Vain, P., Keen, N., Murillo, J. et al. Development of the Particle Inflow Gun. Plant Cell Tiss Organ Cult 33, 237–246 (1993). https://doi.org/10.1007/BF02319007
Technologies


biomaker.org